
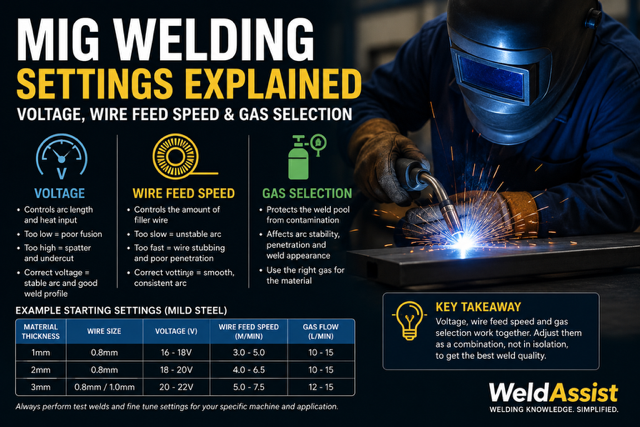

Getting your MIG welding settings right is the difference between producing clean, strong welds and battling problems like excessive spatter, poor penetration, and weak joints. While modern MIG welders often include synergic settings and setup guides, understanding the relationship between voltage, wire feed speed, and shielding gas will help you achieve consistently better results on any machine.
In this guide, we’ll break down the three most important MIG welding settings and explain how to adjust them for different materials and applications.
Why MIG Welding Settings Matter
MIG welding (Metal Inert Gas welding) relies on a continuous wire electrode fed through a welding torch while shielding gas protects the weld pool from atmospheric contamination.
The quality of your weld depends on balancing:
- Voltage
- Wire feed speed
- Shielding gas selection
If one setting is incorrect, the entire welding process can suffer.
Common signs of incorrect settings include:
- Excessive spatter
- Burn-through
- Lack of penetration
- Porosity
- Irregular weld bead appearance
- Wire stubbing into the workpiece
Understanding what each setting controls makes troubleshooting far easier.
Understanding Voltage in MIG Welding
Voltage controls the arc length between the welding wire and the workpiece.
Low Voltage
When voltage is set too low, you’ll typically notice:
- A short, unstable arc
- Excessive spatter
- Narrow weld beads
- Poor fusion at the edges
The weld often sounds harsh and erratic.
High Voltage
If voltage is too high, you may experience:
- Excessively wide welds
- Undercut along the weld edges
- Increased heat input
- Potential burn-through on thin materials
The arc may become difficult to control and appear overly aggressive.
Finding the Correct Voltage
A correctly adjusted voltage produces:
- A stable arc
- Smooth weld appearance
- Good sidewall fusion
- Consistent penetration
As material thickness increases, voltage generally needs to increase as well.
Typical starting points:
| Material Thickness | Voltage Range |
|---|---|
| 1mm Steel | 15-17V |
| 2mm Steel | 17-19V |
| 3mm Steel | 18-21V |
| 5mm Steel | 22-24V |
| 8mm+ Steel | 24-28V |
Always refer to your welder manufacturer’s settings chart as a starting point.
Understanding Wire Feed Speed
Wire feed speed controls how quickly the electrode wire is supplied to the weld pool.
Unlike voltage, wire feed speed directly affects welding current (amperage).
Wire Feed Speed Too Low
When the wire feed speed is too slow:
- The wire burns back toward the contact tip
- Arc instability occurs
- Penetration may be insufficient
- Welding becomes inconsistent
Wire Feed Speed Too High
When set too high:
- The wire pushes into the weld pool
- The torch may feel like it’s “stubbing”
- Excessive spatter develops
- Weld appearance deteriorates
Achieving the Right Balance
Voltage and wire feed speed must work together.
A properly adjusted MIG weld should produce a steady “frying bacon” sound.
If you’re constantly adjusting one setting, you’ll often need to fine-tune the other.
Typical wire feed speeds for mild steel:
| Material Thickness | Wire Feed Speed |
| 1mm | 2.5-4 m/min |
| 2mm | 4-6 m/min |
| 3mm | 5-8 m/min |
| 5mm+ | 7-12 m/min |
These figures vary depending on wire diameter and welding position.
Choosing the Correct Shielding Gas
Shielding gas protects the molten weld pool from oxygen, nitrogen, and moisture in the atmosphere.
Selecting the right gas has a significant impact on weld quality.
Argon/CO₂ Mix (Most Common)
A blend of Argon and Carbon Dioxide is the preferred choice for most mild steel fabrication work.
Benefits include:
- Smooth arc characteristics
- Reduced spatter
- Better weld appearance
- Improved operator control
Common mixtures include:
- 95% Argon / 5% CO₂
- 85% Argon / 15% CO₂
- 80% Argon / 20% CO₂
Pure CO₂
Pure carbon dioxide remains popular due to its lower cost.
Advantages:
- Deep penetration
- Lower gas costs
Disadvantages:
- Increased spatter
- Rougher weld appearance
- Less stable arc
Pure Argon
Pure argon is generally used for:
- Aluminium welding
- TIG welding applications
It is not recommended for welding mild steel with MIG.
Gas Flow Rate
Even the correct gas won’t perform properly if flow rates are incorrect.
Typical flow settings:
- Indoor welding: 10-15 litres per minute
- Outdoor welding: 15-20 litres per minute
Wind and draughts can quickly disrupt shielding gas coverage and cause porosity.
Common MIG Welding Problems and Setting Adjustments
Excessive Spatter
Possible causes:
- Voltage too low
- Wire feed speed too high
- Incorrect gas mixture
Burn-Through
Possible causes:
- Voltage too high
- Travel speed too slow
- Material too thin for settings
Lack of Penetration
Possible causes:
- Voltage too low
- Wire feed speed too low
- Travel speed too fast
Porosity
Possible causes:
- Insufficient gas flow
- Gas leaks
- Contaminated material
- Wind affecting shielding gas
A Simple Method for Setting Up Your MIG Welder
When starting a new job:
Step 1
Check the manufacturer’s recommended settings chart.
Step 2
Set voltage according to material thickness.
Step 3
Adjust wire feed speed until the arc sounds smooth and consistent.
Step 4
Confirm gas flow is appropriate for the working environment.
Step 5
Perform a test weld on scrap material before welding the final workpiece.
Small adjustments can dramatically improve weld quality.
Final Thoughts
Mastering MIG welding settings takes practice, but understanding the relationship between voltage, wire feed speed, and gas selection will help you achieve cleaner, stronger welds with less frustration.
Rather than relying solely on preset settings, take time to understand what each adjustment does. The more familiar you become with your machine, the faster you’ll be able to diagnose issues and optimise weld quality across a wide range of materials and applications.
Whether you’re carrying out fabrication work, vehicle repairs, or general workshop projects, correctly balanced MIG welding settings are the foundation of professional results.
Leave a Reply