
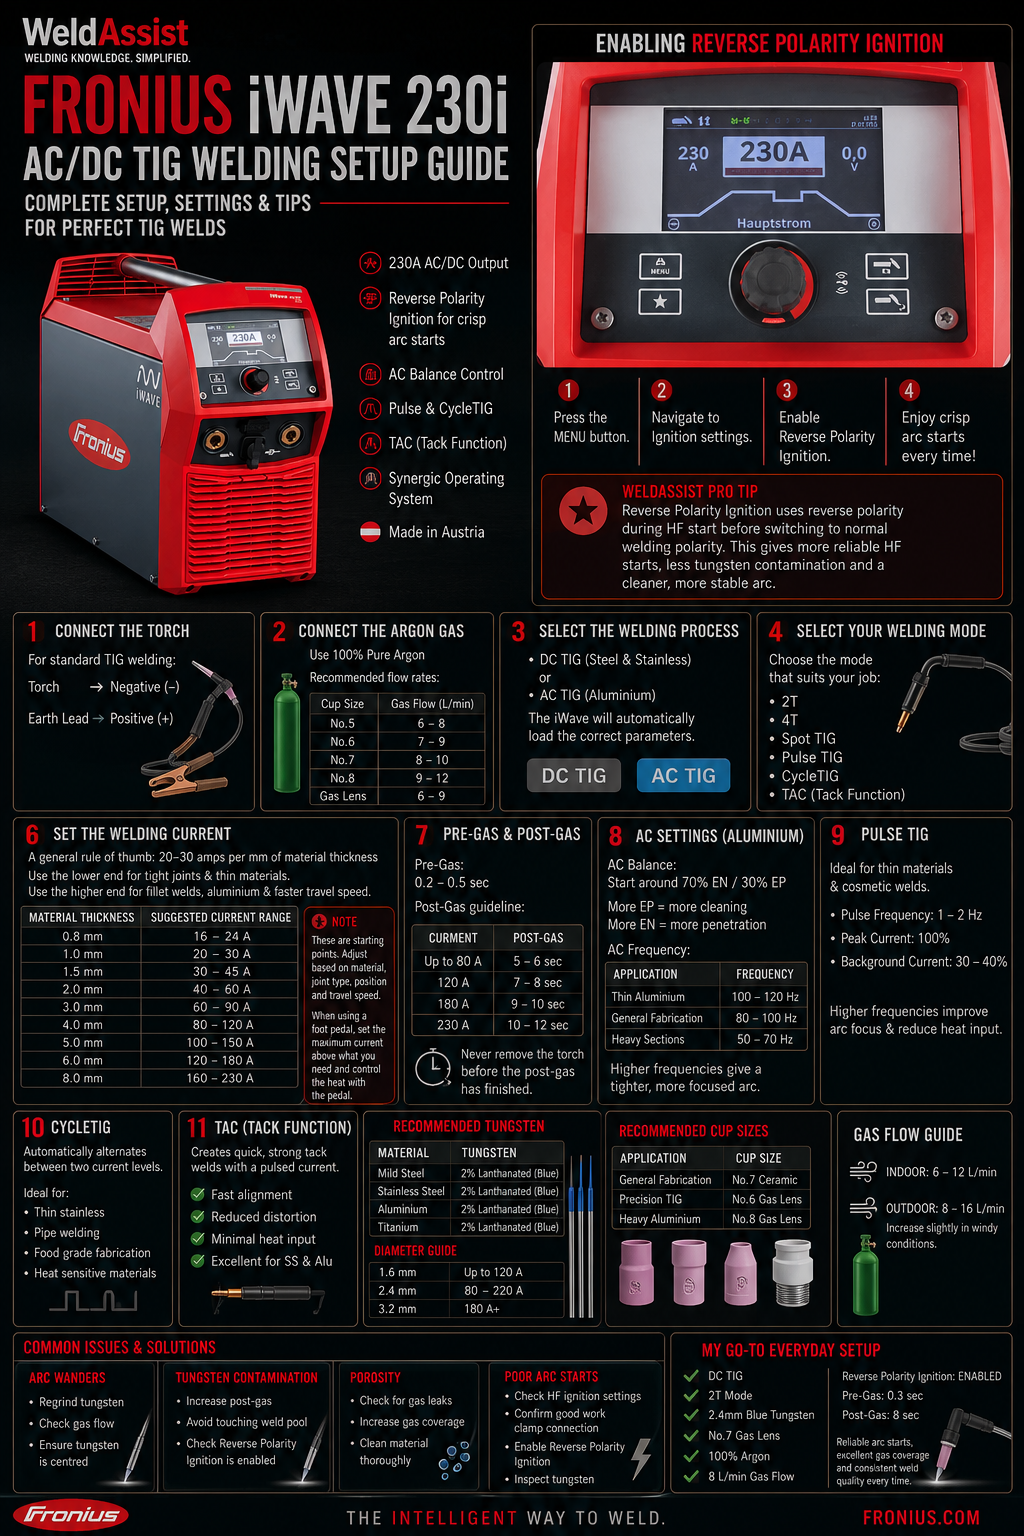
The Complete Guide to Setting Up Your Fronius iWave 230i for Perfect TIG Welds
The Fronius iWave 230i AC/DC is one of the most advanced TIG welding machines available today. Whether you’re welding mild steel, stainless steel, aluminium or exotic alloys, the iWave offers exceptional arc stability, intuitive controls and an impressive range of advanced welding functions.
If you’ve just purchased an iWave 230i or want to get the very best performance from it, this guide will walk you through every step of the setup process.
What You’ll Need
Before you begin, you’ll need:
- Fronius iWave 230i AC/DC
- TIG Torch (TTW3000 or equivalent)
- Pure Tungsten or Lanthanated Tungsten (depending on application)
- Earth Lead
- Argon Gas
- Flow Meter
- Appropriate filler wire
- Ceramic cup or Gas Lens
What Can the iWave 230i Weld?
The iWave is capable of welding:
- Mild Steel
- Stainless Steel
- Aluminium
- Titanium
- Copper Alloys
- Inconel
- Duplex Stainless
- Super Duplex
- Nickel Alloys
making it one of the most versatile AC/DC TIG welders available.
Step 1 – Connect the Torch
For standard TIG welding:
- Torch → Negative (-)
- Earth Lead → Positive (+)
Ensure all DINSE connections are tight before welding.
Step 2 – Connect the Argon Gas
Use:
100% Pure Argon
Recommended flow rates:
Cup Size
Gas Flow
No.5 – 6–8 L/min
No.6 – 7–9 L/min
No.7 – 8–10 L/min
No.8 – 9–12 L/min
Gas Lens with larger cups – 12+ L/min
If welding outside, increase flow slightly while avoiding excessive gas turbulence.
Step 3 – Select the Welding Process
Using the front control panel select:
- DC TIG (Steel & Stainless)
or - AC TIG (Aluminium)
The iWave will automatically load the correct parameter set for your chosen process.
Step 4 – Select Your Welding Mode
The iWave offers several welding modes:
- 2T
- 4T
- Spot TIG
- Pulse TIG
- Cycle TIG
- TAC (Tack Function)
For most workshop fabrication:
2T is recommended.
For longer welds:
4T reduces operator fatigue.
Step 5 – Enable Reverse Polarity Ignition (Highly Recommended)
One of the best features on the Fronius iWave—and one that many users overlook—is Reverse Polarity Ignition.
Why Enable It?
When enabled, the machine briefly uses reverse polarity during HF ignition before switching to the normal welding polarity.
The benefits are immediately noticeable:
- Exceptionally crisp arc starts.
- More reliable HF ignition.
- Reduced tungsten contamination during ignition.
- Improved consistency, particularly on stainless steel.
- Excellent performance on aluminium.
If you’re looking for professional-quality TIG arc starts every time, this is one setting well worth enabling.
WeldAssist Pro Tip: Reverse Polarity Ignition is one of the first settings we enable on demonstration machines because it produces consistently clean, precise arc starts with very little effort.
Step 6 – Set the Welding Current
A reliable starting point is:
20–30 amps per millimetre of material thickness
Use the lower end of the range for:
- Tight-fitting joints
- Outside corner welds
- Thin stainless steel
- Slow, controlled travel
- Good heat control
Use the higher end for:
- Fillet welds
- Lap joints
- Heavier aluminium sections
- Faster travel speeds
- Joints that require greater penetration
Recommended Starting Current
Material Thickness
Suggested Current Range
0.8 mm – 16–24 A
1.0 mm – 20–30 A
1.5 mm – 30–45 A
2.0 mm – 40–60 A
3.0 mm – 60–90 A
4.0 mm – 80–120 A
5.0 mm – 100–150 A
6.0 mm – 120–180 A
8.0 mm – 160–230 A
These figures should be treated as starting points, not fixed settings. The actual current required will depend on the material, joint geometry, welding position and how quickly the operator travels.
For aluminium, you may need to work towards the upper end of the range because aluminium conducts heat away from the weld area rapidly. Thin stainless steel will often require the lower end to avoid distortion and excessive heat tint.
Using a Foot Pedal or Remote Current Control
When using a foot pedal, set the machine’s maximum current slightly above the expected requirement. This gives enough reserve to establish the weld pool quickly while allowing the operator to reduce the current as heat builds in the workpiece.
For example, when welding 3 mm stainless steel, you might set the maximum current to around 80–90 A, then control the actual output with the pedal during the weld.
WeldAssist Pro Tip: The current shown on the machine is the maximum available current when using a foot pedal. You do not need to weld continuously at that value. Use enough current to establish the pool promptly, then back off as the material heats up.
Step 7 – Set Pre-Gas & Post-Gas
Recommended starting values:
Pre-Gas
0.2–0.5 seconds
This protects the tungsten before ignition.
Current – Post Gas
Up to 80 A – 5–6 sec
120 A – 7–8 sec
180 A – 9–10 sec
230 A – 10–12 sec
Never remove the torch before the post-gas has finished.
Step 8 – AC Settings for Aluminium
For aluminium:
AC Balance
Start around:
70% EN / 30% EP
More EP:
- Increased cleaning action.
More EN:
- Greater penetration.
AC Frequency
Suggested starting points:
Thin Aluminium
100–120 Hz
General Fabrication
80–100 Hz
Heavy Sections
50–70 Hz
Higher frequencies produce a tighter, more focused arc.
Step 9 – Pulse TIG
Pulse TIG is ideal for:
- Thin stainless
- Titanium
- Sheet aluminium
- Cosmetic welds
Suggested starting point:
- Pulse Frequency: 1–2 Hz
- Peak Current: 100%
- Background Current: 30–40%
Higher pulse frequencies can improve arc focus and reduce heat input.
Step 10 – CycleTIG
CycleTIG is unique to Fronius.
It automatically alternates between two current levels without requiring the welder to manually pulse the torch.
Ideal for:
- Thin stainless steel
- Food-grade fabrication
- Pipe welding
- Heat-sensitive materials
- Titanium welding
Step 11 – TAC (Tack Function)
The TAC function creates quick, strong tack welds by momentarily pulsing the current.
Benefits:
- Fast alignment.
- Reduced distortion.
- Minimal heat input.
- Excellent fit-up for stainless and aluminium.
Recommended Tungsten Selection
Material Tungsten
Mild Steel – 2% Lanthanated (Blue)
Stainless Steel – 2% Lanthanated
Aluminium – 2% Lanthanated
Titanium – 2% Lanthanated
Diameter Guide:
- 1.6 mm → Up to 120 A
- 2.4 mm → 80–220 A
- 3.2 mm → 180 A+
Recommended Cup Sizes
General Mild Steel Fabrication:
No.7 Ceramic cup
Precision stainless steel TIG:
No.10/12 Furick Gas Lens Cup
Heavy Aluminium:
No.8 Collet Body Ceramic Cup
Common Problems & Solutions
Arc Wanders
- Regrind the tungsten.
- Check gas flow.
- Ensure the tungsten is centred.
Tungsten Contamination
- Increase post-gas.
- Avoid touching the weld pool.
- Check Reverse Polarity Ignition is enabled.
Porosity
- Check for gas leaks.
- Increase gas coverage.
- Clean the parent material thoroughly.
Poor Arc Starts
- Check HF ignition settings.
- Confirm the work clamp has a clean connection.
- Enable Reverse Polarity Ignition.
- Inspect the tungsten for contamination or incorrect grinding.
My Favourite Everyday Setup
For most mild steel and stainless fabrication:
- DC TIG
- 2T Mode
- 2.4 mm Gold or Blue Tungsten
- No.12 Furick Gas Lens ceramic cup
- 100% Argon
- 10-12 L/min Gas Flow
- Reverse Polarity Ignition: Enabled
- Pre-Gas: 0.3 sec
- Post-Gas: 5 sec
This setup delivers reliable arc starts, excellent gas coverage and consistent weld quality across a wide range of fabrication work.
WeldAssist Pro Tip
Don’t get overwhelmed by the iWave’s extensive feature set. Begin with the synergic and default welding parameters, then adjust only one setting at a time. The biggest improvements usually come from optimising your tungsten preparation, shielding gas coverage and enabling Reverse Polarity Ignition for consistently crisp, repeatable arc starts.
Related WeldAssist Guides
- Pulse TIG Welding Explained
- AC Balance Explained
- How to Choose the Correct Tungsten
- TIG Gas Lens vs Standard Collet Body
- TIG Tungsten Contamination Explained
- Fronius CycleTIG Explained
- TIG Welding Aluminium – Complete Setup Guide
Leave a Reply